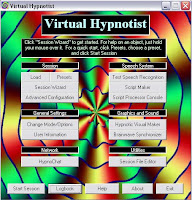
 Once you've tried a few preloaded VH sessions, you'll begin to have an idea of what you like and don't like in a VH experience. Then you might start thinking about how you could change things to make them better for you. That's where "Advanced Configuration" comes in. Click on this button from the main VH screen, and you'll be presented with a number of different tabs that let you change pretty much anything you want within a session. I'll take the tabs in order from left to right.
The "Information" Tab
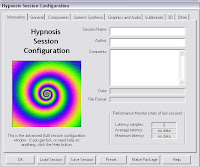 If you don't already have a session loaded when you open the "Advanced Configuration" window, the data fields in this tab will be blank. At this point you can either load an already-complete session by clicking the "Load" button, or you can create a new one from scratch. If you create a new session, you can type anything you like in the empty fields under this tab, then click the "Save Session" button at the bottom to make the session official. Once you've saved it, you can load it just like you'd load any other VH session, including the ones that came with the program and any you've downloaded from another website.
The same row of buttons appears beneath each of the "Advanced Configuration" tabs, so while we're on this tab, let's go ahead and talk about the rest of the row.
- When you're finished working on a session and are ready to run it, just click "OK" to go back to the main screen. Note: be sure to save the session first if you plan to use it again with any changes you've made.
- You can load a session from here just as you can from the main screen. The only difference is that if you load a session while in "Advanced Configuration" mode, you stay in "Advanced Configuration" mode and can customize the session instead of just running it as-is. You can also preview the various elements, as I explain below when I talk about the Components tab.
- The save button includes a "save as" option, just in case you were wondering.
- The "Preset" button loads the same preset sessions that can be accessed the main menu screen. Once again, loading one here keeps you in "Advanced Configuration" mode and lets you preview and/or customize the elements. And yes, you can save a preset in a customized version.
- The "Make "Package" button allows you to create a shareable version of your session, like the ones I offer on my main web page. This is an advanced function, not something you'd be likely to use until you're pretty familiar with VH. But when you are ready to use it, you should be aware that VH will automatically package the four parts of the script, the subliminal messages, and the settings for the audio and video files (not the files themselves). It will not automatically package wordlists used with a grok tunnel or any audio or video elements, including any you've created on your own. However, these elements are easy enough to add to the package. By the time you understand VH well enough to do use this function, you should be able to figure it out on your own.
- The "Help" button brings up the official VH help files.
The "General" Tab
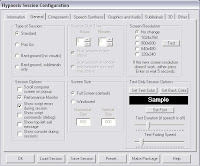 This tab does a number of things, most of which I don't use much, but I'll describe a few of them:
 - You can configure a session to suddenly pop up and start automatically while you're at your computer, doing something else. That would be fun for people who like the thought that they could be "dropped" suddenly, without warning. I'm not one of those people. ;-P
- You can set just the subliminal messages or just the background audio to run while you're working at your computer, doing something else. I tried this and found it it very distracting, but that's just me.
- I do use the "Screen Size" option when testing a script I'm working on, because when you run VH in the normal full-screen mode, the only way to move to another program is to stop the VH session. If you're testing a script bit-by-bit (more on that here), it can be useful to let the audio run while you click over to the text of your script and make any necessary changes.
- "Screen Resolution" changes your whole screen resolution. This is probably not something you want to do.
- If you need to run your sessions with visible text, this is where you should go to configure exactly how you want that text to look. You will almost certainly have to change the "text duration" and "text fading speed," as the default is extremely slow, but how much to change them will be a matter of personal preference.
The "Components" Tab
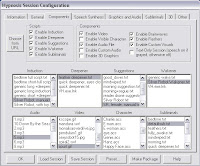 Here we have the most useful tab of them all. I mentioned the Session Wizard on the Getting Started page as one way of customizing your session from start to finish; but IMO, the "Components" tab is a better option. Even a quick glance at it will show you that you can select or deselect most of the elements I described on the Elements of a Session page right here in a single spot, and pick exactly the one(s) you want. You can also preview any of the items in the drop-down menus by double-clicking on them. If they're scripts, you'll see the text; and if they're audio or video, they'll pop up and play in a media player. Even the animated characters will appear and blink at you, or otherwise show off. I described each of the elements in detail on the Elements page of this tutorial, so I'll just make a few additional notes here:
 - If you enable custom audio in a session, it will automatically disable all the scripts in that session. This is because the custom audio replaces the scripts. If you enable the custom audio on this tab, you will then need to select the custom audio on the Grapics and Audio tab. I'll talk more about that process when I get to that tab.
- Enabling the 3D custom graphics will disable the video. I believe you must download and install the TrueVision 3D Graphics Engine (another free download available through a link from this page) to get any use out of the 3D custom graphics; however, I have tried this and still could not get the 3D graphics to load in VH. It might be something to do with the age of my computer. Anyway, if you can get the 3D graphics to work, they're configured under the 3D tab.
- Enabling the brainwaves enables only the binaural beats. Once you enable them, you can change their configuration under the Other tab if you want to. However, you don't need to change the configuration in order to run them.
- Enabling the flashers enables the flasher bars, not the phrase flashers (The phrase flashers are configured under the Subliminals tab). The flasher bars are configured under the Other tab, but once again, you don't need to configure them to make them work.
- If you enable the custom visuals, you should go to the Other tab to select the specific visuals you want.
- You can enable a text-only session in two different ways (assuming the speech synthesizer is installed). Click once, and the check in the box will be gray rather than black. This will give you a session with both text and speech synthesis. Click a second time, and the check in the box will be black. This will give you a session with text only. Either way, if you want to display the text during a session, it will be helpful for you to go back to the General tab to adjust the text display settings. The default setting is very, very slow.
The "Speech Synthesis" Tab
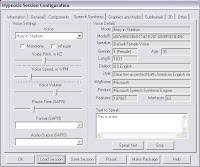
If you are using scripts rather than custom audio with your VH session, VH will employ the Microsoft Speech Synthesizer (SAPI4) to read the scripts to you. You can choose from a variety of different voices (some only available if you add in the "Videos and Characters Expansion Pack" - another free download from here). The default voice is very robotic, but some of the other ones can be rigged to sound like a deeply entranced real person - which is, IMO, a pretty cool effect. Once you're ready to start writing your own scripts, check out my Getting the Most Out of the Speech Synthesizer page for some tips and tricks. In the meantime, I suggest Mary in Stadium or Mike in Stadium as your vocal choice because these two voices are the clearest and most human-sounding. Plus, the "stadium," effect, when played through your earbuds, makes it sound like the voice is literally echoing inside your empty head. That's a squirmingly great effect if you're a hypno-fetishist. Try the "Mary" voice at a pitch of about 200 HZ, or "Mike" at a pitch of about 140. Alternately, the Adult male, British English, voice sounds nice at pitch 85; but I don't think much of the "Adult female, British English" voice. The best speed for all these voices is somewhere between 95 and 105 WPM. One final note about this easy-to-figure-out-on-your-own tab: You can type any text you like into the "Text to Speak" box to hear how the voice sounds. However, you should not rely on this test box as a guide for how a line will sound in an actual VH script. There can be a lot of variation between the two.
The "Graphics and Audio" Tab
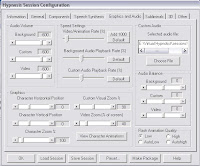
This is another tab that you shouldn't have to work with very often, but you probably will have to use it once in awhile. I'll just go over the really necessary bits.
- If you're using one of the preloaded audio backgrounds or replacing the scripts with a custom audio file, your various audio volumes should be appropriately balanced, and you shouldn't have to adjust the "Audio Volume" sliders. However, if you've pulled in an .mp3 or .wav of your own to use as your background audio (saving it in the VH "audio" folder), you might have to fiddle with the first slider. If you do, you should know that dragging it to the left reduces the volume, and dragging it to the right increases the volume. Taking it all the way to the left mutes the audio completely.
- When would you need to use the "video volume" slider? Well, let's say you downloaded a video from YouTube because you liked the visuals, but you really don't want the crappy music that came with it playing over your VH session. Take that "video volume" slider all the way to the left, and you're good to go.
- I have never needed to explore the "Speed Settings," "Audio Balance," or "Flash Animation Quality" options under this tab.
- Under the "Graphics" section of this tab, the only setting I've never needed to change is the "Video Zoom." It's useful to know that the best zoom ratio for the preloaded VH "videos" is 40%. 100% might sound like the right ratio, but it usually isn't; at this size, the images tend to look pixellated. I'm still not sure what these percentages are percentages of, but trust me on this.
- The "Custom Audio" section of this tab is where you enable a recording that you plan to use in place of a script. Now, this process can be just a little bit tricky, so I'll walk you through it. First, save the new audio file in the VH "sessions" folder. Second, enable the custom audio (under the Components tab) if you haven't already done so. Third, go to the Graphics and Audio Tab and select the file in the "Custom Audio" section. Now, this is where it gets just a little tricky. Note that the default option in the "file name" field is the name of the currently-selected session. You can easily change that by selecting the audio file you want, but then when you try to save the session, you'll find yourself prompted to save the session under the name of the newly-selected audio file. But just switch it back, and you're good to go. See? I told you it was just a little bit tricky.
The "Subliminals" Tab
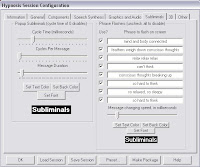 This tab is divided into two sections that correspond with the two kinds of subliminal messages you can use during your VH session. Assuming you really do want to use both kinds of subliminals, you might need to make the following adjustments on this tab: On the Popup Subliminals half of the tab, drag the "cycle time" slider up to about 400. IMO, this is the best rate for the subliminals to "pop," though of course you can experiments with other rates to see what you like best. Next, drag the "cycles per message" slider down to one. Then set the "message duration" somewhere around 19. Finally, set the text color to white or very pale gray. On the Phrase Flashers half of the tab, you can type in up to eight phrases of your own choosing that will flash along the top and bottom of the screen during your session. Be sure to check the box to the left of each phrase you want to use. Then change the text color to white or very pale gray. Leaving the text color black is equivalent to disabling the phrase flashers, since they can't be seen against the black background. If you like, you can also change the font face and font size of both types of subliminal messages by clicking their corresponding "Set Font" buttons.
The "3D" Tab
Apparently, you must download and install the TrueVision 3D Graphics Engine (another free download available through a link from this page) to get any use out of the 3D custom graphics; however, I have tried this and could not get the 3D graphics to load. It might be something to do with the age of my computer. Anyway, since I haven't been able to explore this option, I'm afraid I can't tell you how to use it.
The "Other" Tab This is a tab where you can really have some fun. Under this tab are three buttons: "Brainwave Synchronizer," "Hypnotic Visual Maker," and "Session File Editor."
Now, the Session File Editor warns you right up front not to mess with it unless you're very, very sure you know what you're doing. I haven't been that sure, and I haven't messed with it; so I'll just be discussing the Brainwave Synchronizer and the Hypnotic Visual Maker here.
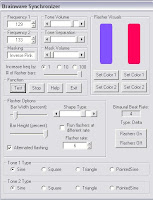 The Brainwave Synchronizer is where you customize the binaural tones and flasher bars that will run during your session. As a quick reminder, binaural beats are a method of inducing a particular state of consciousness by playing one tone in one ear and a slightly different tone in the other ear - or flashing a light at one rate on one side of a person's vision and flashing another light at a slightly different rate on the other side of a person's vision. If you enabled both the brainwaves and the flashers under the Components tab, they'll both play a part in your VH session. Now, you might or might not want to fiddle with the frequency of the binaural beats. The default frequency of 6 works quite nicely, though I've found that for me, 5 is even better. If you want to experiment, first check out this page for an explanation of how the different frequencies affect your brain, then do some experimenting to see which one you like best. Once you know that, you can adjust the two frequencies under this tab easily enough - and the flasher bar frequency, as well.
 Do note that the lower the frequencies go, the louder you'll have to adjust the volume if you actually want to hear them. Some people don't like to hear them, but I do, because it reminds me that there's yet another element of the VH session doing its best to brainwash me. It makes the experience that much more intense. However, if you don't want to hear them, just turn the volume down a bit and increase the volume of the "inverse pink masking," which is basically just static that hides the tones. Now, even if you don't want to change the frequencies of the tones, you might still want to change the color and/or shape of the flasher bars. Personally, I like the bars to be in the same color range as any video and custom visuals I'm using; I just think it looks more artistic that way. ;-) If you feel the same, you can adjust Color 1 on the left-hand flasher and Color 2 on the right-hand flasher to whatever you like easily enough. You can also change the shape of the flasher bars by playing with the "shape type" slider. As you can see, there are some other adjustments you can make under this tab, but I haven't found the need to experiment with them, so let's move on.
The Hypnotic Visual Maker has four tabs of its own.
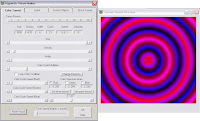 The first is the Color Tunnel. As you can see, there are 12 preset tunnels to select from, then a bunch of ways to change those presets. Personally, I think the presets are all so nice that I normally don't change anything about them except size and direction. A size change is sometimes necessary because if you use a video along with the color tunnel, it's going to appear on top of the color tunnel; therefore, you have to make the tunnel large enough to show around the edges of the video. As for changing the direction of the color tunnel, that will give you the effect of brainwashing rays pulsing straight at you. Combine that with noticeably loud binaural tones, and you can have a lot of fun. ;-)
 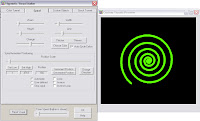 The Spiral tab lets you create a spiral of the color, thickness, and complexity of your choice. Please refer to the VH help guide for detailed instructions on how to use this tab.
 I really haven't felt the need to explore the Custom Objects tab yet, but it looks as though a dedicated experimenter could use it to create mutliple shapes of multiple colors with multiple effects.
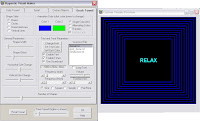 The Grok Tunnel is a funky, retro-SF-ish hypnotic visual that combines zooming rectangles, lines, or circles; short, simple phrases; and a tone that gradually decreases in pitch. It can be very effective at hypnotizing you, and it's most effective when it's not mixed with too many other elements. IMO, the settings under this tab are pretty easy to experiment with, so I'll just point out a few things you would only learn through experience:
 - A circle might look nicely round in the preview window, but when you run the session, it'll become oblong, conforming to the width of your screen. You'll have to experiment with the "shape width" slider to see what looks best on your particular monitor.
- Do not enable brainwaves or flasher bars in a grok session; this causes the session to bomb out at random times, apparently because the two kinds of tones conflict with one another.
- IMO, subliminal pop-ups and phrase flashers clutter the screen of a grok session and decrease from the hypnotic effect.
- Grok scripts are different from the scripts employed by the speech synthesizer. They're saved in the "wordlists" subdirectory of your VH folder, and they don't employ any special coding. All you have to do to write a grok script of your own is create a text document of short, simple words and phrases, separating each with a single line break; and save it in the right folder.
- Grok scripts advance much more quickly than speech synthesis scripts: about 43 lines per minute. Bear that in mind when you're planning the length of your session.
- You can use regular induction/suggestion/etc. scripts along with the grok tunnel to create a nicely overwhelming effect. However, you should be aware that if the "loop text" box isn't checked, the session will end automatically when VH reaches the end of the grok script. And since the grok scripts run so fast, your session might wink out suddenly in the middle. Not a pleasant experience. Either check the "loop text" box, or else make sure your grok script is very, very long.
*Virtual Hypnotist is a freeware program created by Follow the Watch, not by me, and the program includes its own help files. You can download Virtual Hypnotist here.