 Unless you're writing a grok or subliminals script, which don't require any formatting other than line breaks, you'll need to learn how to use Virtual Hypnotist's specialized coding. Fortunately, it's not very difficult. Just take a look at the screen grab here. It's mostly straight text, isn't it? Just a few unusual characters, like the "speak" that begins each line, some percentage and pound signs, and a sprinkling of pau's followed by numbers. You can handle that, can't you? Sure you can.
Now, I'm not going to try to explain every little code tag to you, because that would just take too long; and this page will be plenty long enough without my doing that. What I'm going to do instead is to a) recommend you study the script guide (part of the VH Help files) and a few of the scripts that came preloaded with the program, and b) give you some tips regarding the most useful bits of code, as well as the bits that aren't easy to figure out from the script guide alone. I'm also including a Quick Reference Guide that can be used in conjunction with this tutorial.
Once you're ready to start writing and coding, you have a couple of choices. VH does include a Script Maker that you can access from the main menu. You can use it to write your scripts and just insert the code in chunks wherever necessary. However, you still have to learn the code in order to insert it via the Script Maker; and I've experienced some glitches in sessions where I cut and pasted things into the Script Maker. Plus, the Script Maker doesn't wrap text, which can be annoying when you have a really long line.
All in all, I find it easier to hand-code my scripts in another program that's designed for simple text documents, something like Notepad. However, you can use this tutorial to help you work with the VH Script Maker or any program that lets you create simple text documents. Just don't use Word or something else designed for more complex word processing. That causes glitches in VH sessions, too.
Now, if you do want to use a program other than the VH Script Maker, and if you're willing to part with a little money in exchange for a very handy program with many potential uses, I recommend TextPad. This is a shareware program I picked up many years ago, and I've used it quite successfully with a number of different coding languages. The screen grab above demonstrates how you can open several files at once in TextPad and easily switch between them.
But again, Notepad should work just fine if you want to use that. And the Script Maker is certainly suitable for people who don't want a lot of fuss.
And so, onward to...
Helpful Coding Hints
Testing Scripts
There are a couple of ways to test your scripts, depending on how smooth you want them to sound.
1. If you're not too particular about things like the length of pauses or how realistic you can get the speech synthesizer to sound, then you can use the Script Processor Console (accessible from the main menu) and just check the syntax of your code. The easiest way to do this is either to type the script in the Script Maker from the start, or else open the Script Maker and load your script into it. Then you can click Preview > Check Syntax. This will cause VH to skim very quickly through your code and notify you of any errors. Alternately, you can click Preview > Entire Script to let the console check each line one by one, but it does this in "real time," so if you've written a script that runs 30 minutes, it'll take 30 minutes to preview it. And I'm not really sure what kinds of errors VH can find by previewing this way that it can't find by simply checking the syntax, since I haven't bothered to run a 30-minute script through it this way.
2. On the other hand, if you really do care about things like pause lengths, visual effects, etc., then I recommend that you write just a little bit of code at a time and test it manually to be sure it works before writing a bit more. The easiest way I've found to do this is to create a special induction script called "test.txt," which you save in your VH "inductions" folder; then build a new session called "test," using only the test.txt induction. Don't include any other scripts; and don't include any graphics, subliminals, or brainwaves (unless, of course, those are things you're testing). Do resize the session window as described in my discussion of the General tab).
Now, begin writing your script in the test induction file. Write just a line or two, then try loading and running the test session to see how it works. If everything checks out, cut the lines you just wrote out of "test.txt" and paste them into another text document that will be part of your actual script (You see now why it's helpful to be able to switch back and forth between open text files). Save that new document in the appropriate VH folder; then go back and write a few more lines in test.txt, test them, paste them beneath the previous paste, and so on.
Do not exit a test session prematurely, if at all possible. Ending a very short session (or even ending a longer session right at the beginning) by using the escape key can make VH malfunction when you try to run it again. Then you have to exit VH entirely and restart it to clear the glitch. This also happens, though somewhat less frequently, if you end a test run by right-clicking. So if you have to exit a test early, use the right-click, but try not to exit early at all.
One little note: A sound you're loading will sometimes play itself at the very beginning of a test run, rather than in its proper place within the script. This fixes itself when you run the whole session; but you can make the sound appear in its proper place in a test session by having a few lines of dialogue ahead of the "speak" command.
Pauses
The pause tag can be placed after a comma, after a period, or by itself on its own separate "speak" line.
The longest possible pause you can code is 2250 milliseconds, but you can stack them like this to create longer pauses:

The length of the pause between "speak" lines is determined by the Microsoft speech synthesizer, not by VH itself, and the speech synthesizer is easily confused and tends to stop pausing between "speak" lines whenever you code for a sound, such as snap.wav. I have yet to find a way around this problem; however, I've found that if I'm deep enough in trance when the speak lines start running together, I don't even notice. And since I'm just high strung and persnickety in general, this might not annoy anyone else, anyway. Therefore, I'll go ahead and give you some notes about using sounds in a VH script - along with some notes about using audio, which doesn't cause any problems.
Sounds and Audio
To insert a sound like a snap into your session, the code is simply "sound" instead of "speak," then the name of the file in the VH "sounds" folder that you wish to use:

Remember: you cannot use the "sound" command to call any sound file that has a multi-word name unless all the words are connected by underscores, dashes, etc. So, for instance, I've gone into the "sounds" folder and renamed the loud snap to "Snap_Very_Loud.mp3," and the snap with echoes to "Snap_Loud_w_6_Echoes.mp3." I suggest you do the same before you use any of these sounds in a script. (Note that the same restriction applies to loading and running other files and scripts mid-session; you'll need to join all parts of multi-word names with underscores or something similar.)
A long enough sound file (like the snap with echoes) will bleed over into the spoken text that follows it, which can create a nice effect. However, if another sound immediately follows the long sound, the long sound will be cut short. To avoid this problem, you should insert a long enough pause between the two sounds to allow the first one to finish its run before the second one cuts in.
As noted above, inserting a sound (like a snap) into a session will cause the speech synthesizer to stop pausing between lines - for the duration of that script only. So, for instance, if you have a snap in the induction, when the deepener starts running, the pauses will resume. If you want to keep the sound in the induction but still have pauses, you'll have to insert one manually at the end of each line.
Fortunately, background audio doesn't cause this problem.
You can have a lot of fun with the background audio, changing the volume, turning it off and on the middle of sessions, or even changing from one background audio file to another.
The background volume can be anywhere from -5000 (silent) to 0 (nicely loud). If you checked the "enable audio file" box on the Components tab when configuring your session, the volume will already be set when you start the session (to -600, if you didn't adjust the slider on the Graphics and Audio tab). But let's say you want to make the background volume louder as the session goes along. You can change the volume level at any point you like, as often as you like, with the "backvol" command. Here's an example, changing the background volume to -100:

Of course, you can make the background volume quieter just as easily, or silence it completely by changing the number to -5000.
Note: When you change from one script to another within a session (for example, from induction to deepener), the background volume will revert to the setting you chose under the Graphics and Audio tab. If you want to keep the new volume when you change scripts, just paste the "backvol" command in again at the top of the new script.
Now let's say you want to change from one background audio file (mantra1.wav) to another (mantra2.wav) in the middle of a session. Note that a) background audio files must be saved in the VH "audio" folder; and b) as with sound files, any separate words in the name must be joined together with dashes or underscores.
You chose mantra1.wav as your background audio already from the "Components" tab, when you were configuring the session. So all you need to do now is insert some code in the script where you want to make the switch:

The new background audio file will continue to play when you change from one script to another within a session; you don't need to repeat the command as you do with the background volume command.
You can change the volume of the speech synthesizer just as you can change the volume of the background audio. Here is the command for decreasing the volume by what I consider to be the most useful increment, 5000:

This command does not go on a line by itself. Instead, you can insert it anywhere within a line of text, just like the pause command; and you can insert it as many times as you like. Let's say you have a five-word sentence, and you want it to grow gradually louder and louder as it's spoken. Just drop a \vol=+5000\ command in between each word, and you'll get a wonderful effect.
Note: Like some of the other audio elements, the volume of a session will reset itself to the preselected value when you shift from one script to another (for instance, from the induction to the deepener). Thus, if you want to continue the changed volume when you start a new section of the session, you'll need to start the first spoken line of the new script with a command to change the volume all over again - and if you've made more than one change to the volume, you'll have to add your figures together here and adjust by the total change. For instance, if you decreased the volume by 5000 three times during the induction, and you want to keep the new volume when you enter the deepener, then you have to start with a command to decrease by 15000.
Subliminal Effects
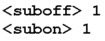
Here are the codes for turning the subliminal pop-up's off and on:
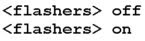
The codes to turn the phrase flashers off and on are these:
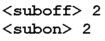
The codes to turn the flasher bars off and on are these:
The subcycletime command doesn't seem to work, but you can make the subliminals appear to pop up faster by loading a new subliminal file with more words. The more words you use, the faster the subliminals pop.
Here is the code for loading a new set subliminals (which should be a text file you've already saved in the "subliminals" folder):

Subliminals stay visible longer when you increase the subduration. 19 is a good rate. At 80 or longer, the words hang around long enough to comprehend consciously, which can be useful when you're testing something. Here's the code for changing the subduration:

With the code below you can display a subliminal image for a specified number of milliseconds, at a specified point on the screen. The first number after the file name is the number of milliseconds the image will be displayed, the second number is its horizontal position (left to right) on the screen, and the third number is its vertical position (top to bottom). So in this example, robot1.jpg would pop up for one third of a second, centered, near the bottom of the screen.

Of course, you'll want to test any subliminal image you load to be sure it isn't partially obscured by the central video image (which always appears on top of everything else) and that it doesn't drop off the side or bottom of the screen. Large images can do that, if you're not careful.
NOTE: The speech synthesizer will not talk while a subliminal image is visible, and the subliminal image will not appear while the speech synthesizer is still talking. Therefore, it's good to put a \pau=100\ at the end of the "speak" line just before the image, and another one right after the image. This will ensure only very brief gaps between voice and image and voice again.
Custom Visuals and Background Video
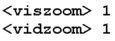
You can't turn the custom visuals and background video off completely, if you started the session with them enabled, but you can reduce them to pinprick size with this code, which takes them down to 1% of their current size ("viszoom" is for the custom visuals and "vidzoom" is for the video):
If you use this code, and also change the video image to a simple black JPG (see below), it will look as if the custom visuals and background video are turned off.
NOTE: A solid black JPG will be completely invisible against the black background at any size. A solid black GIF is visible as dark gray against the black background but can't be seen if it's reduced to a pinprick.
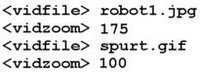
Here's the code for replacing the background video with the image solidblack.jpg, which should be stored in the "videos" folder:

If you want to change the background video back to what it was before (or to something else), simply use the "vidfile" command again with the name of the new image.
Changing the background video to another image and then immediately changing it back again is another good way to generate a subliminal image - this time in the middle of the screen. Note that if you code a subliminal image this way, the image will be zoomed by the same percentage as the regular background video (40%, if you're following my recommendations). This can create some unwanted effects, but you can adjust the size of the subliminal image by using the "vidzoom" command, as below. Run a few tests with different numbers to get the size you want, bearing these facts in mind:
1. If you want the subliminal image to appear smaller than the regular background video image, zoom to a number lower than 100. To make the subliminal image larger than the background video was, zoom to a number greater than 100.
2. When you swap the background video back to the original image, resize it to 100 to make it the same size it was before you dropped in the subliminal image.
FUN STUFF: You can also use the "vidfile" code above to load a video in the middle of a session that began with the video option disabled. All you need to do is check the "enable video" box on the Components tab and set the Video Zoom where you want it on the Graphics and Audio tab, then go back and uncheck the "enable video" box and put the "vidfile" code wherever you want it in your script. When the session runs, it will begin with no video displayed, then enable your chosen file when it reaches that point in the script.
Creating Prompts
I've noticed, in exploring the different pre-installed scripts on VH, that they demonstrate several different ways to code the yes/no prompt. However, the one I'm giving you below is the most reliable version of the command that I've tried, so I recommend that you stick with it. When this code is run, the text immediately following the "yesno" tag appears in a pop-up box. The "run" line takes your listeners to the wakener if they click "yes." If they click "no," they will hear the next "speak" line that begins with, "All right"; and then VH will continue to read on down through the rest of the script.
NOTE: If you use "yesno" to switch to a new script (for instance, a wakener), once that new script has finished running, VH will attempt to return to the line below the "yesno" command in the former script. Thus, you could end up running a wakener once by calling it from the "yesno" command, then running it a second time when the session loops back to just below the "yesno" command and continues the usual course to the wakener. To prevent this from happening, always end your wakener script with "stop" rather than "end." This will bring the entire session to a close after the wakener runs once.
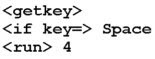
An alternative to the "yesno" command is the "getkey" command, which doesn't involve a pop-up box but instead waits for the listener to strike a key and then takes a programmed action. This can be useful if, for instance, you just want to pause a session until the listener is ready to move on. Here's an example of the getkey command at work, once again taking the listener to the wakener.
 Of course, if you use getkey, you will have to find some way to tell your listeners that you want them to strike a key. The easiest method is via a "speak" command, but you can also temporarily replace the central video image with a GIF or JPG you've created that shows a pop-up message. You can reuse the one I made, if you like, as long as you give me credit in the script.
NOTE 1: If you do temporarily replace the background video image, you will have to reload the old image (or a different one) when you're done with the "hit the space bar" image. If you're using "hit the space bar" to move to the wakener or another script, then start the wakener script by loading the new/old image there.
NOTE 2: If an animated GIF (rather than the "hit the space bar" JPG) is running when your listener strikes the spacebar, that image is likely to freeze. Therefore, it's a good idea to reload the GIF immediately following the "getkey" command.
The example above shows you how to move from one script to another, for instance from the suggestions to the wakener. But you can also use "getkey" to move from one point in a script to another point in the same script. The code here is different in two ways: first, you use "gotolabel" instead of "run"; and second, you place a "label" at "destination" point in your script. Here's an example.
This is the code for a "getkey" command telling the session to return to the top of the current script:

...And here is the code for the label itself. Since I want to go back to the very top of the script, I would make the label the very first line of this script:

If you want to use "gotolabel" to jump to a different point in the script, just put the label code at that point in the script. You can name it anything you like and it will work, as long as you put the label on a line all by itself and include a colon after the name.
You can even use multiple labels within one script. Just give each one a different name.
*Virtual Hypnotist is a freeware program created by Follow the Watch, not by me, and the program includes its own help files. You can download Virtual Hypnotist here.