 Okay, I lied when I suggested this would be my last Virtual Hypnotist tutorial. I've decided to blog twice about writing scripts, focusing on the coding here and on getting the most out of the speech synthesizer in the final entry.
Now, I know some of you are probably shuddering already at the thought of trying to write code, so let me begin with this reassurance: The VH code is very easy to work with. Just take a look at this screen grab. It's mostly straight text, isn't it? Well, aside from the "speak"
What Program Should I Do the Coding In?
VH includes a "script maker" that allows you to insert the bits of code using a drop-down menu; but I'll be honest: I've barely tried it. I realized pretty quickly that I'd need to study the help menu's script guide even to use the script maker; and since I'm a longtime hand-coder of websites, I figured I might as well just do the VH scripts manually, too. It's almost as fast, and I feel like I have more control. Besides, I've experienced some glitches in VH when cutting and pasting in the script maker program (trying to code by hand even there, you see), so IMO, it's safer just to code in another program. Notepad should work just fine, but I personally like TextPad, a shareware program I picked up many years ago, that I've used quite successfully with a number of different coding languages. The screen grab above demonstrates how you can open several files at once in TextPad and easily switch between them.
But again, Notepad should work just fine if you want to use that. And the script maker probably works fine, too.
Anyway, I think this blog entry will probably be helpful to you, no matter which route you choose for script writing.
What this Tutorial Will and Won't Do
I'm not going to try to explain every little code tag to you, because that would just take too long; and this entry will be plenty long enough without my doing that. What I'm going to do instead is to a) recommend you study the script guide and a few of the scripts that came preloaded with VH, and b) give you some tips regarding the most useful bits of code, as well as the bits that aren't easy to figure out solely by reading the script guide.
And now, onward to...
Helpful Coding Hints
I strongly recommend that you write a just little bit of code at a time, then test it to be sure it works before writing a bit more. The easiest way I've found to do this (and also to test various visual effects) is to create a special session called "test," with an induction script also called "test," and whatever graphics you like. After writing few lines of the real script, copy and paste them into the blank "test" induction, then load and run the test session. Tweak the words and coding as necessary; then cut the revised bits from the test script, if you made any revisions (Be careful not to delete the test file itself!); paste the revision back into your real script; and go again.
Do not exit a test session prematurely, if at all possible. Ending a test run with the escape key often makes the test session malfunction when you try to run it again, and then you have to exit VH entirely and restart it to clear the glitch. This also happens (though somewhat less frequently) if you end a test run by right-clicking. So if you have to exit a test early, use the right-click.
Now, there are just a couple of things that don't always work properly when you test them in brief snippets. These things generally iron themselves out when you run the completed session, so I'm just noting them here to make you aware of them:
1. There will be little to no pause between the first "speak"
2. A sound you're loading will sometimes play itself at the very beginning of a test run, instead of in its proper place within the script. Again, this fixes itself when you run the whole session; but you can make the sound appear in its proper place in a test session by having a few lines of dialogue ahead of the
Pauses
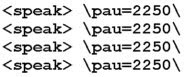
The pause tag doesn't work after commas and only works sporadically at the end of lines (excluding test runs, when it almost certainly won't work at the end of the first line). It does work after periods, or when it's placed on its own separate "speak" line, all by itself.
The longest possible pause you can code is 2250 milliseconds, but you can stack them like this to create longer pauses:
Sounds
You cannot use the "sound" command on any .wav or .mp3 that has a multi-word name unless all the words are connected by underscores, dashes, etc. So, for instance, I've gone into my VH "sounds" folder and renamed the loud snap to "Snap_Very_Loud.mp3," and the snap with echoes to "Snap_Loud_w_6_Echoes.mp3." I suggest you do the same before you use any of these sounds in a script. (Note that the same restriction applies to loading and running scripts; you'll need to join all parts of multi-word names with underscores or something similar.)
A long enough sound file (like the snap with echoes) will bleed over into the spoken text that follows it, which can create a nice effect. However, if another sound immediately follows the long sound, the long sound will be cut short. To avoid this problem, you should insert a long enough pause in between the two sounds to allow the first one to finish its run before the second one cuts in.
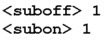
Subliminal Effects
Here are the codes for turning the subliminal pop-up's off and on:
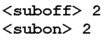
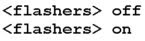
The codes to turn the phrase flashers off and on are these:
The codes to turn the flasher bars off are these:
The "subcycletime" command doesn't seem to work, but you can make the subliminals appear to pop up faster by loading a new subliminal file with more words. The more words you use, the faster the subliminals pop.

Subliminals stay visible longer when you increase the subduration. 19 is a good rate. At 80 or longer, the words hang around long enough to comprehend consciously, which can be useful when you're testing something. Here's the code for changing the subduration:

With the code below (Click the thumbnail for a larger view), you can display a subliminal image for a specified number of milliseconds,

NOTE: The speech synthesizer will not talk while a subliminal image is visible, and the subliminal image will not appear while the speech synthesizer is still talking. Therefore, it's good to put a \pau=100\ at the end of the "speak" line
Custom Visuals and
You can't turn the custom visuals and background video off completely, if you started the session with them enabled, but you can reduce them to pinprick size with this code, which takes them down to 1% of their current size:
If you use this code, and also change the video image to a simple black JPG (see below), it will look as if the custom visuals and background video are turned off.
NOTE: A solid black JPG will be completely invisible against the black background at any size. A solid black GIF is visible as dark gray against the black background but can't be seen if it's reduced to a pinprick.
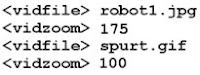
Here's the code for replacing the background video with the image solidblack.jpg, which should be stored in the "videos" folder:

If you want to change the background video back to what it was before (or to something else), simply use the "vidfile" command again with the name of the other image.
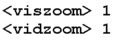
Changing the background video to another image and then immediately changing it back again is another good way to generate a subliminal image - this time in the middle of the screen. Note that if you code a subliminal image this way, the image will be zoomed by the same percentage as the regular background video (40%, if you're following my recommendations). This can create some unwanted effects, but you can adjust the size of the subliminal image by using the "vidzoom" command, as below. Run a few tests with different numbers to get the size you want, bearing these facts in mind:
1. If you want the subliminal image to appear smaller than the regular background video image, zoom to a number lower than 100. To make the subliminal image larger than the background video was, zoom to a number greater than 100.
2. When you swap the background video back to the original image, resize it to 100 to make it the same size it was before you dropped in the subliminal image.
Coding for Prompts
I've noticed, in exploring the different pre-installed scripts on VH, that they demonstrate several different ways to code the yes/no prompt. However, the one I'm giving you below is the most reliable version of the command I've tried, so I recommend that you stick with it.
Click the thumbnail below for a full-sized sample of the yes/no box in action. When this code is run, the text behind the "yesno" tag appears in a pop-up box. The "run" line takes your listeners to the wakener if they click "yes." If they click "no," they will hear the next "speak" line that begins with, "All right"; and then VH will continue to read on down through the rest of the script.

NOTE: If you use "yesno" to switch to a new script (for instance, a wakener), once that new script has finished running, the session will attempt to return to the line below the "yesno" command in the former script. Thus, you could end up running a wakener once by calling it from the "yesno" command, then running it a second time when the session loops back to just below the "yesno" command and then continues its usual course to the wakener. To prevent this from happening, always end your wakener script with "stop" rather than "end." This will bring the entire session to a close.
An alternative to the "yesno" command
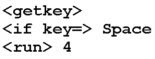
 Of course, you will have to tell your listeners, one way or another, that you want them to strike a key. The easiest way to do this is to tell them via a "speak" command, but you can also temporarily replace the central video image with a GIF or JPG you've created that shows a pop-up message. You can reuse the one I made, if you like, as long as you give me credit in the script.
NOTE 1: If you do temporarily replace the background video image, you will have to reload the old image (or a different one) when you're done with the "hit the space bar" image. If you're using "hit the space bar" to move to the wakener, then start the wakener script by loading the new/old image there.
NOTE 2: The background video is likely to freeze when you strike the space bar. Therefore, it's a good idea to reload that video immediately following the "getkey" command. You can see where I've done just that in the screen grab at the top of this entry.
And that's it for Virtual Hypnotist 104. VH 105 might or might not follow tomorrow.
No comments:
Post a Comment